


There are a handful of Silksong achievements which are extraordinarily onerous to get, like Metal Soul or the uniquely challenging Cursed trophy. Probably the most intimidating is the Speedrunner trophy, which duties gamers to beat the sport in underneath 5 hours. Although this may appear robust, if the place to go and what to prioritize, any participant can beat Silksong inside this strict time restrict.
This information offers an inventory of all the pieces it’s essential to get to speedrun Silksong in underneath 5 hours, and presents a step-by-step rationalization of the optimum speedrunning route Silksong gamers can observe that leads Hornet to the ultimate boss as quick as potential. Simply strive to not die, or you’ll lose a lot of time backtracking to your cocoon.
Going off the principle path to get non-compulsory upgrades and skills can really prevent time in the long term – extra Needle injury makes fights simpler, and the Faydown Cloak makes platforming sections considerably much less irritating.
Up to date October 6, 2025 by Erik Petrovich: A few month after its preliminary launch, many gamers have beat the true Act 3 ending in Silksong and are going again to finish different necessities and unlock each achievement. One of many hardest achievements to get is the Speedrunner Silksong achievement, which requires gamers to beat the sport in underneath 5 hours. This requires you to observe a really particular route and full particular stipulations – like 5 Bell Benches that have to be activated all through Pharloom. Although most Bell Benches are in your foremost path, two areas function Bells which are a bit extra out of the way in which: Greymoor and Shellwood. This information to speedrunning Silksong has been up to date with a revised route that features all Bell Bench places, which have been unnoticed of the unique model of this walkthrough.
The whole lot You Have to Do to Beat Silksong in Underneath 5 Hours
Listing & Places of The whole lot Required to Speedrun Silksong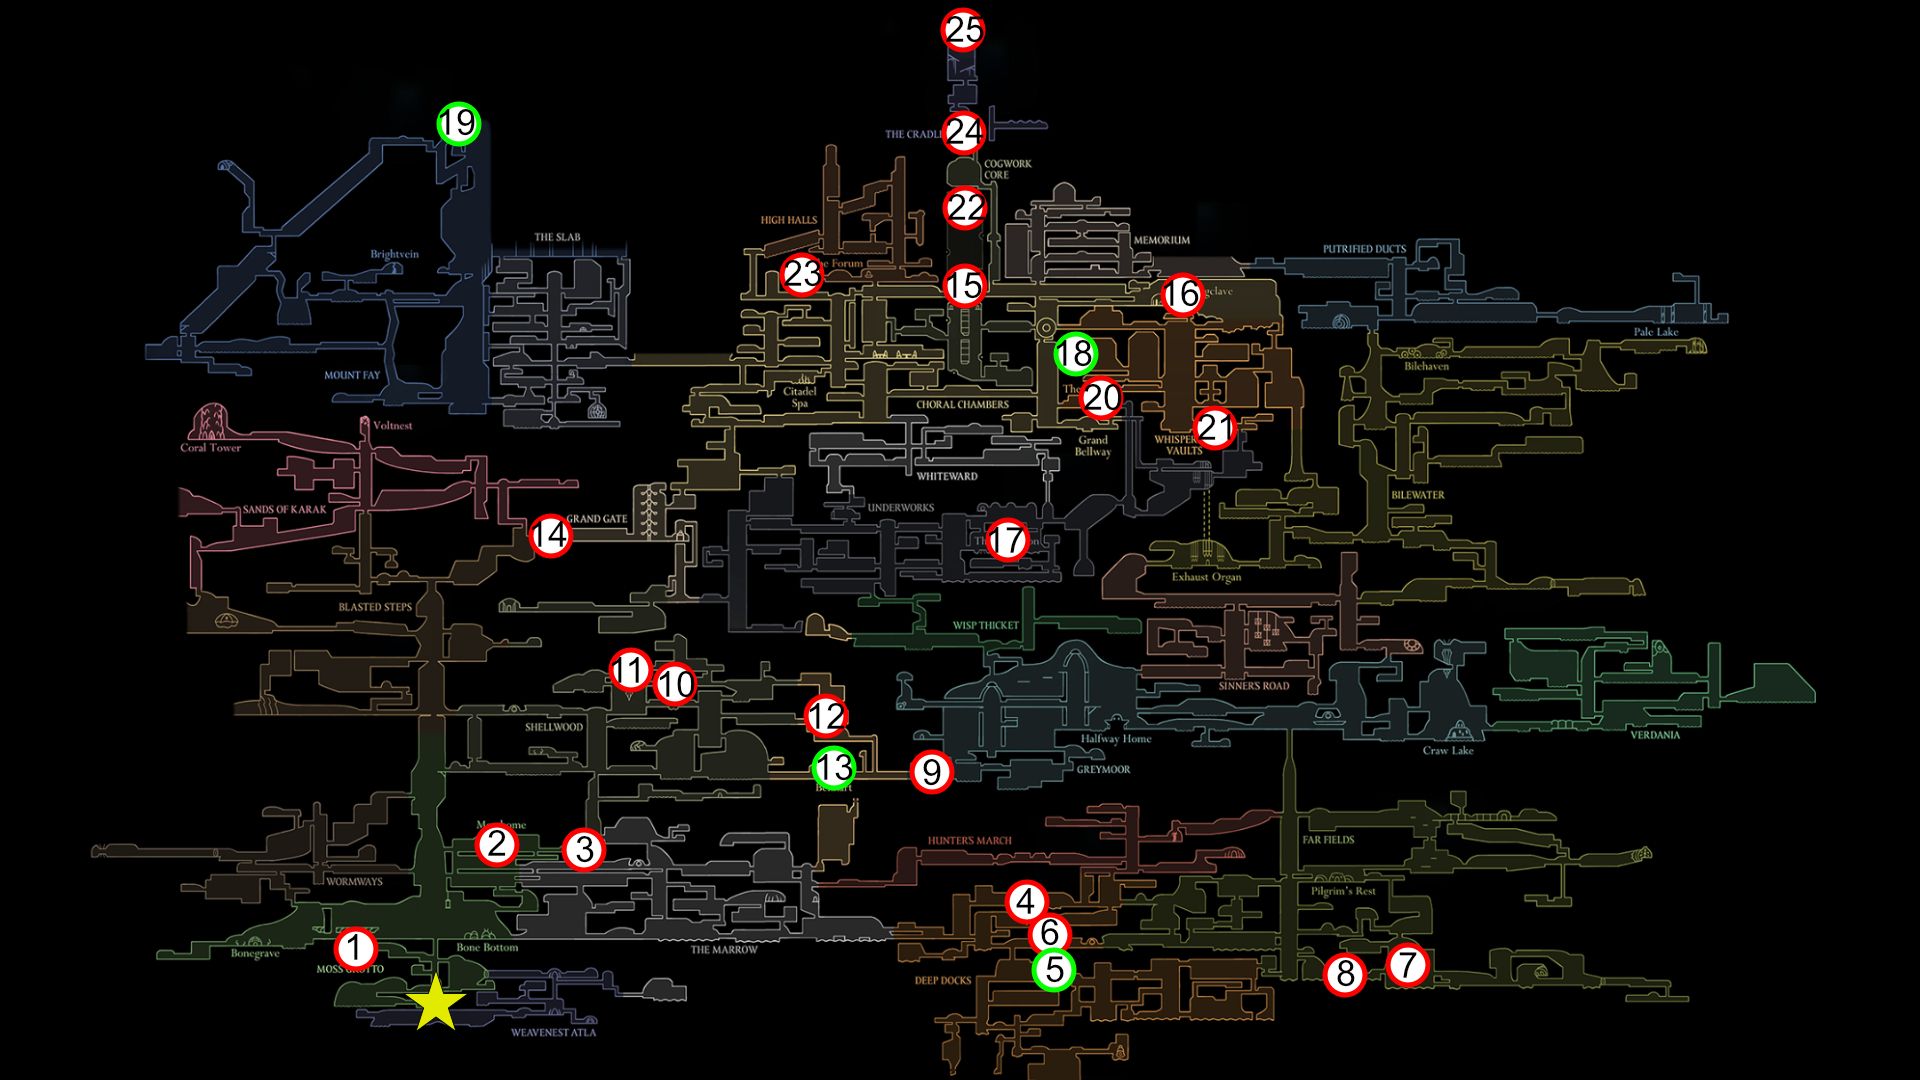
|
Map Marker |
Identify |
Sort |
|---|---|---|
|
✰ |
START LOCATION |
– |
|
1 |
Moss Mom |
Boss |
|
2 |
Silkspear |
Capacity |
|
3 |
Bell Beast |
Boss |
|
4 |
Swift Step |
Capacity |
|
5 |
Forge Daughter |
Non-compulsory Software vendor |
|
6 |
Lace |
Boss |
|
7 |
Drifter’s Cloak |
Capacity |
|
8 |
The Fourth Refrain |
Boss |
|
9 |
Moorwing |
Boss |
|
10 |
Sister Splinter |
Boss |
|
11 |
Cling Grip |
Capacity |
|
12 |
Widow / Needolin |
Boss / Capacity |
|
13 |
Needle Improve #1 |
Non-compulsory Improve |
|
14 |
The Final Choose |
Boss |
|
15 |
Cogwork Dancers |
Boss |
|
16 |
White Key |
Key Merchandise |
|
17 |
Clawline |
Capacity |
|
18 |
Pale Oil #1 (Needle Improve #2) |
Non-compulsory Improve |
|
19 |
Faydown Cloak |
Non-compulsory Capacity |
|
20 |
Trobbio |
Boss |
|
21 |
Vaultkeeper’s Melody |
Key Merchandise |
|
22 |
Architect’s Melody |
Key Merchandise |
|
23 |
Conductor’s Melody |
Key Merchandise |
|
24 |
Lace |
Boss |
|
25 |
Grand Mom Silk |
Remaining Boss |
Silksong Speedrun Route Step-by-Step Clarification
Optimum Silksong Speedrun Path to Get the Speedrunner Trophy

-
1: Start the sport by making your method by means of the linear Moss Grotto, beat Moss Mom, then get to Bone Backside.
- Go to the correct of Bone Backside to enter The Marrow.
- Open the shortcut door, then go proper and up by means of a niche within the ceiling.
-
2: Go left on the prime to seek out Shakra, then go up and left to enter the highest of Moss Grotto.
- Get the Silkspear ability, then return down, unlock the elevator shortcut to Bone Backside, then go up and proper to get again into The Marrow by way of the exit above the elevator.
-
3: Free the Bell Beast with Silkspear, then subdue it.
- Go proper from the Bellway to succeed in the first required Bell Bench. Hit the lever to ring the bell at B1, relaxation on the bench, then proceed to the correct.
- On the far proper facet of the Marrow, drop down and proceed usually rightward to get to Deep Docks.

-
4: Go up from Shakra’s location, then proper for 2 rooms, and up once more to enter a small Gauntlet with Skarr enemies.
- Drop right down to the left and proceed left to get the Swift Step potential.
-
5: Optionally, drop down under the room with Shakra and meet the Forge Daughter.
- You possibly can find a Craftmetal to the far proper of the Marrow Bellway.
- Get the Sting Shard from the Forge Daughter, which is extremely helpful towards quite a lot of flying enemies, particularly within the Excessive Halls Gauntlet.
-
6: Use the Swift Step potential to leap as much as a lever that may open the boss door to Lace.
- Defeat Lace, then proceed to the correct and activate the second required Bell Bench.
- Hit the lever to ring the bell at B2, then go to the correct to enter the Far Fields.
-
7: Proceed rightward within the Far Fields, then drop down the central room stuffed with wind funnels to seek out an exit on the bottom-right.
- Proceed to the correct till you discover the Seamstress. Full the Seamstress’ quest to unlock the Drifter’s Cloak, which permits Hornet to drift.
-
8: Go to the left from the Seamstress’ hut to battle the Fourth Refrain in your method again to the central room stuffed with wind funnels.
- Trip the wind funnels upward with the Drifter’s Cloak, and destroy explosive growths on the way in which to free extra wind funnels and proceed up.
- When you’ll be able to fly up no additional, go into the exit on the prime of the shaft to enter Pilgrim’s Relaxation.
- Return to the shaft by way of the exit on the top-left, simply above the doorway to Pilgrim’s Relaxation, to proceed upward and break by means of the ceiling into Greymoor.

-
9: First, go proper to activate the Bell. Then, go left to make your option to the Midway Home.
-
You should defeat the Craw enemies and the gauntlet to the correct of the Greymoor entrance, additional proper from Shakra’s location, then loop again to get to the third Bell Bench.
- Alternatively, you’ll be able to return to Greymoor after getting Cling Grip in Shellwood to extra simply attain this Bell Bench with out coping with the Craw gauntlet.
- Both method, this Bell is required to enter Act 2 by way of the Final Choose, so simply be certain to loop again and ring the Bell Bench at B3 in some unspecified time in the future after reaching Greymoor.
- Proceed left till you attain the Midway Home. Sit on the bench right here, then proceed to the left by means of the ruined buildings of Greymoor till you attain Moorwing within the bottom-left of the zone.
- Defeat Moorwing to get to Bellhart and enter Shellwood additional to the left.
-
You should defeat the Craw enemies and the gauntlet to the correct of the Greymoor entrance, additional proper from Shakra’s location, then loop again to get to the third Bell Bench.

-
10: In Shellwood, make your option to the highest of the primary room by looping left, then upward to the correct, then left once more.
- Within the subsequent room, drop down, then go up and unlock the central Bench in Shellwood.
- Then, proceed to the left to seek out an elevator. Trip this down, then go left till you discover a tall room stuffed with white flowers.
- Use these to climb upward, then go proper to seek out one other elevator.
- Unlock this shortcut, which leads right down to the central Bench, then go proper. Navigate this room to get to the top-left exit to reach Sister Splinter.
-
11: Defeat Sister Splinter, then go left and make your method across the central pillar to get to the top-left facet of this room.
- Enter this room, then hit the white flowers and soar as you loop left, then proper to succeed in the highest proper exit (above the room entrance).
- Unlock the Cling Grip ability by way of the weaver statue within the subsequent room, then proceed to the correct.
-
12: Make your method again to the central Bench, then go up and to the correct as you utilize your new Cling Grip potential to wallclimb to the Bellway tunnels above Bellhart.
- Make your method right down to battle Widow. Defeat Widow to get the Needolin potential and free Bellhart.
- Activate the fourth Bell Bench instantly after the Widow boss battle. Hit the lever to ring the bell at B4, then proceed again into Bellhart.
- Activate the fifth and last Bell Bench within the top-left space of Shellwood, to the left of the Bellway. To get right here, go all the way in which to the bottom-left of Shellwood, then take the shaft upward and go proper. You’ll find yourself on the left facet of the Bellway – ring the bell at B5 to finish the necessities to activate the Final Choose boss battle.
- 13: Optionally, after releasing Bellhart, discover Pinmaster Plinney in his hut on the prime degree of Bellhart.

-
14: After defeating Widow, go all the way in which to the top-left facet of Shellwood to enter the Blasted Steps.
- Make your method by means of this zone with a mixture of your motion expertise till you attain the Bench on the prime of the zone.
- Make your option to the doorway to the Citadel to the correct of this Bench, then defeat The Last Judge to enter Act 2.

-
15: Drop down into the Underworks and make your method by means of this zone to re-enter the Choral Chambers.
- Go up, then proper alongside the gently sloping lengthy hallway. Within the subsequent room, take the top-left exit, then go all the way in which up the subsequent room to discover a Bench on the far top-left facet of the Choral Chambers.
- Go to the correct from this bench to face the Cogwork Dancers and get the Pharloom’s Crown quest, which expenses Hornet to find the three pieces of the Threefold Melody.
- 16: Go to the correct from the Cogwork Dancers boss room to unlock Songclave on the First Shrine, within the far top-right of the Choral Chambers.
-
17: Return to the White Key elevator and unlock it. Make your method by means of the Whiteward till you attain its bottom-right exit to enter The Cauldron.
- Drop down, then go left above a weaver statue surrounded by lava in a blocked-off room under. Loop down, proper, then again as much as attain this room and unlock the Clawline ability.
-
18: Optionally, enter the Whispering Vaults by way of the Cogwork Core, which itself may be accessed by dropping under the Cogwork Dancers boss enviornment.
- Go to the top-right of this space to get to the left facet of the big wheel gate.
- Open the way in which main proper by hitting the lever, then make your method down and take the primary exit on the left facet.
- Proceed to the top-left of this room to unlock a shortcut again to the Choral Chambers and purchase a Pale Oil, which can allow you to get the second Needle improve.

-
19: Optionally, enter The Slab from the left facet of the Choral Chambers, then make your option to the underside to enter Mount Fay.
- If you can also make it to the highest of Mount Fay, you’ll get the Faydown Cloak, which lets Hornet double soar. That is an extremely useful potential that may save time in different elements of the run, however will not be technically required.
- For those who really feel assured that you could get this throughout the 5-hour time restrict, use your Clawline to enter the zone to the left of The Slab Bellway.

-
20: On the bottom-left of the central foremost room within the Whispering Vaults, take the exit that results in The Stage.
- Unlock the shortcut again to the Choral Chambers, then sit on the Bench within the Grand Bellway.
- Go into The Stage to challenge Trobbio. After beating this boss, take the exit to the underside proper of the boss enviornment to drop into the Underworks.
-
21: Make your option to the top-right by means of this part of the Underworks till you re-emerge into the Whispering Vaults.
- Choose up the Sacred Cylinder, then search for Vaultkeeper Cardinius a couple of rooms above the exit from the Sacred Cylinder room.
- Give the Sacred Cylinder to Vaultkeeper Cardinius to unlock the Vaultkeeper Melody.
-
22: From the Cogwork Dancers boss enviornment, drop down, then loop to the top-right facet of this room to seek out the doorway to a sub-zone.
- Use your Clawline and motion expertise to grapple onto the hook and journey round this room, then take the exit on the top-left. You’ll attain the highest half of the Cogwork Core.
- Rigorously platform by means of the room to make it to the top-left facet, the place you’ll be able to clear up the Architect puzzle and earn the Architect Melody.
-
23: From the bench within the top-left facet of the Choral Chambers, use your Clawline to grapple your method upward and enter the Excessive Halls.
- Platform round this zone, utilizing your Drifter’s Cloak and Clawline in tandem with each other to soundly keep away from spikes, till you attain the bottom-right facet of the subzone.
- Sit on the bench right here, then go left to enter the High Halls Gauntlet.
- Beat the Gauntlet to learn the Conductor’s Melody from Conductor Ballador.

-
24: Return to the Cogwork Dancers boss room and play the Threefold Melody for the traditional statues.
- Take the elevator upward to seek out and battle Lace for the second time.
- Defeat Lace to proceed progressing upward into The Cradle.

-
25: Make your option to the very prime layer of The Cradle to problem Grand Mom Silk.
- Beat this final boss of Act 2 throughout the time restrict to earn the Speedrunner achievement in Silksong!